Email Notifications
Email Notifications
By using this site, you agree to our Cookie Policy
Email Notifications
Email notifications are an essential way to keep customers, staff, and admins updated about bookings. Booknetic provides a powerful notification system that works hand in hand with the Workflows Module, so you can automate confirmations, reminders, cancellations, follow-ups, and more.
This documentation explains how to configure email notifications, create them through workflows, and personalize them for your business needs.
Before setting up notifications, configure your email delivery method:
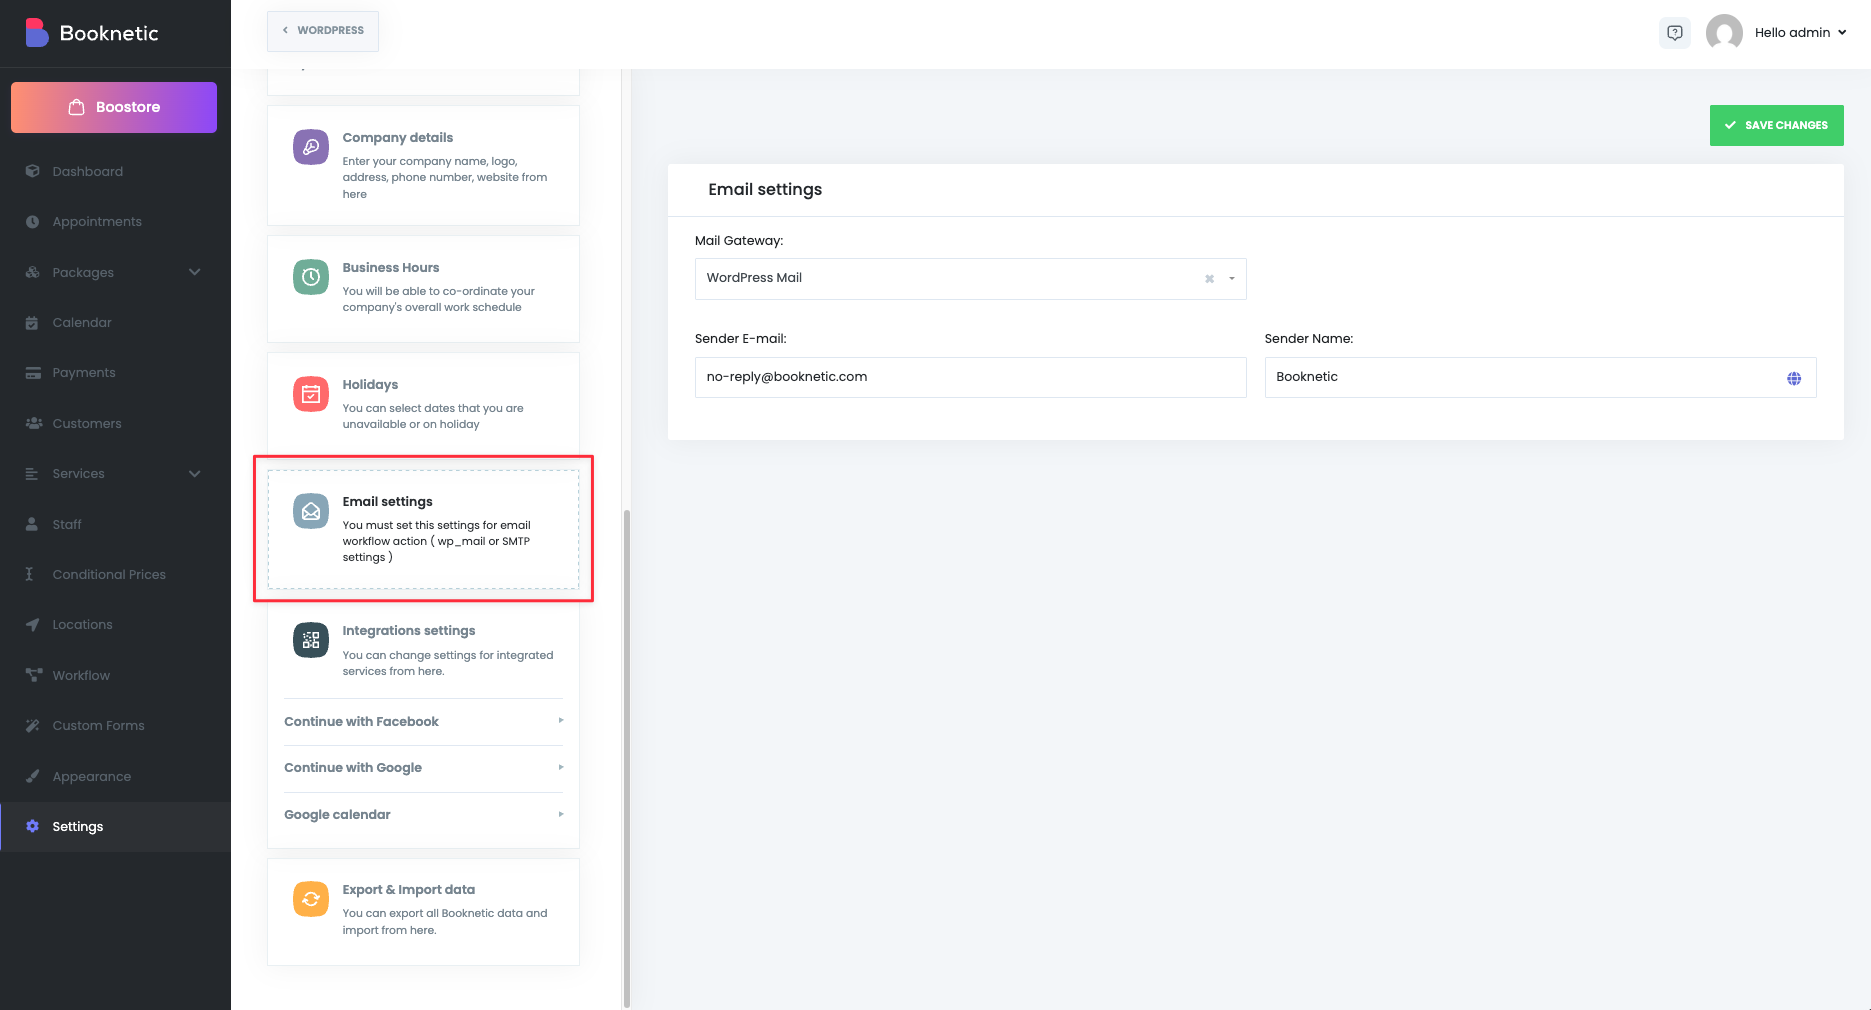
Booknetic can use WordPress’ default mail function.
Go to Booknetic Settings → Email Settings.
Enter your WordPress email and Sender Name.
Save changes — no additional setup needed.
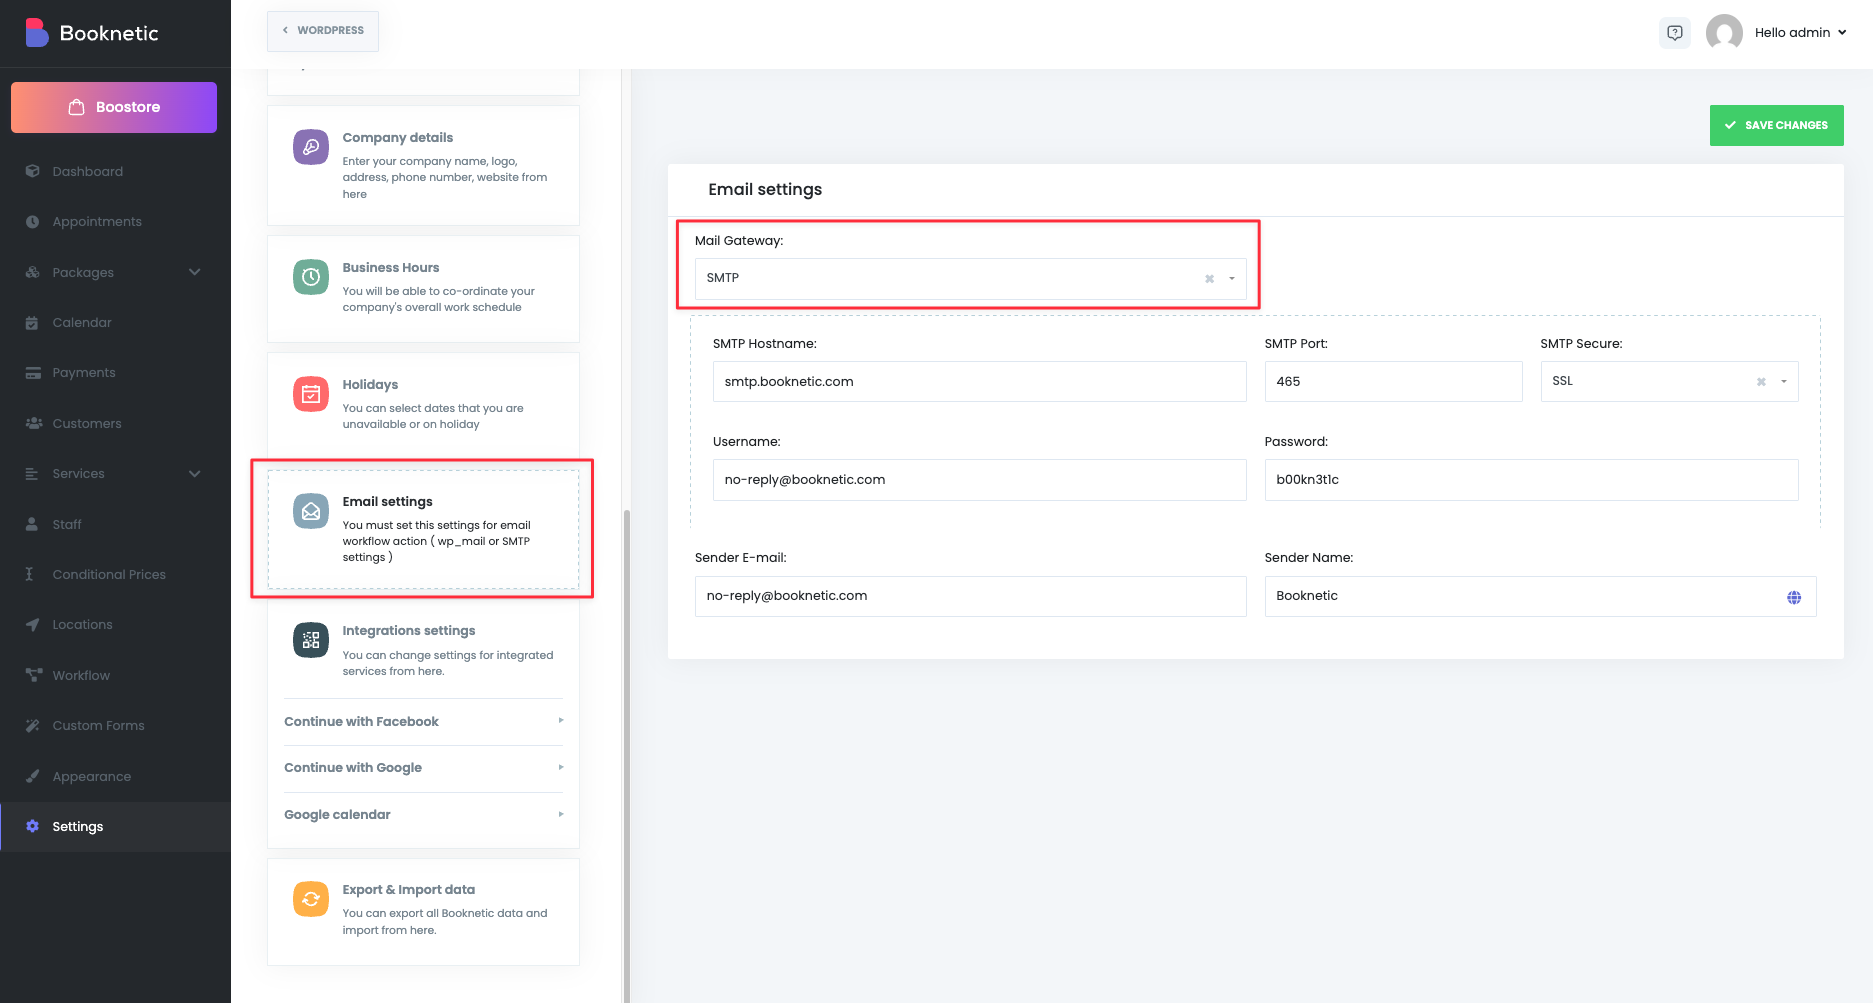
For more reliable delivery, you can configure SMTP:
Go to Booknetic Settings → Email Settings.
Enter your SMTP host, port, username, and password.
Select the encryption type (SSL/TLS).
Add your Sender Name.
Save changes.
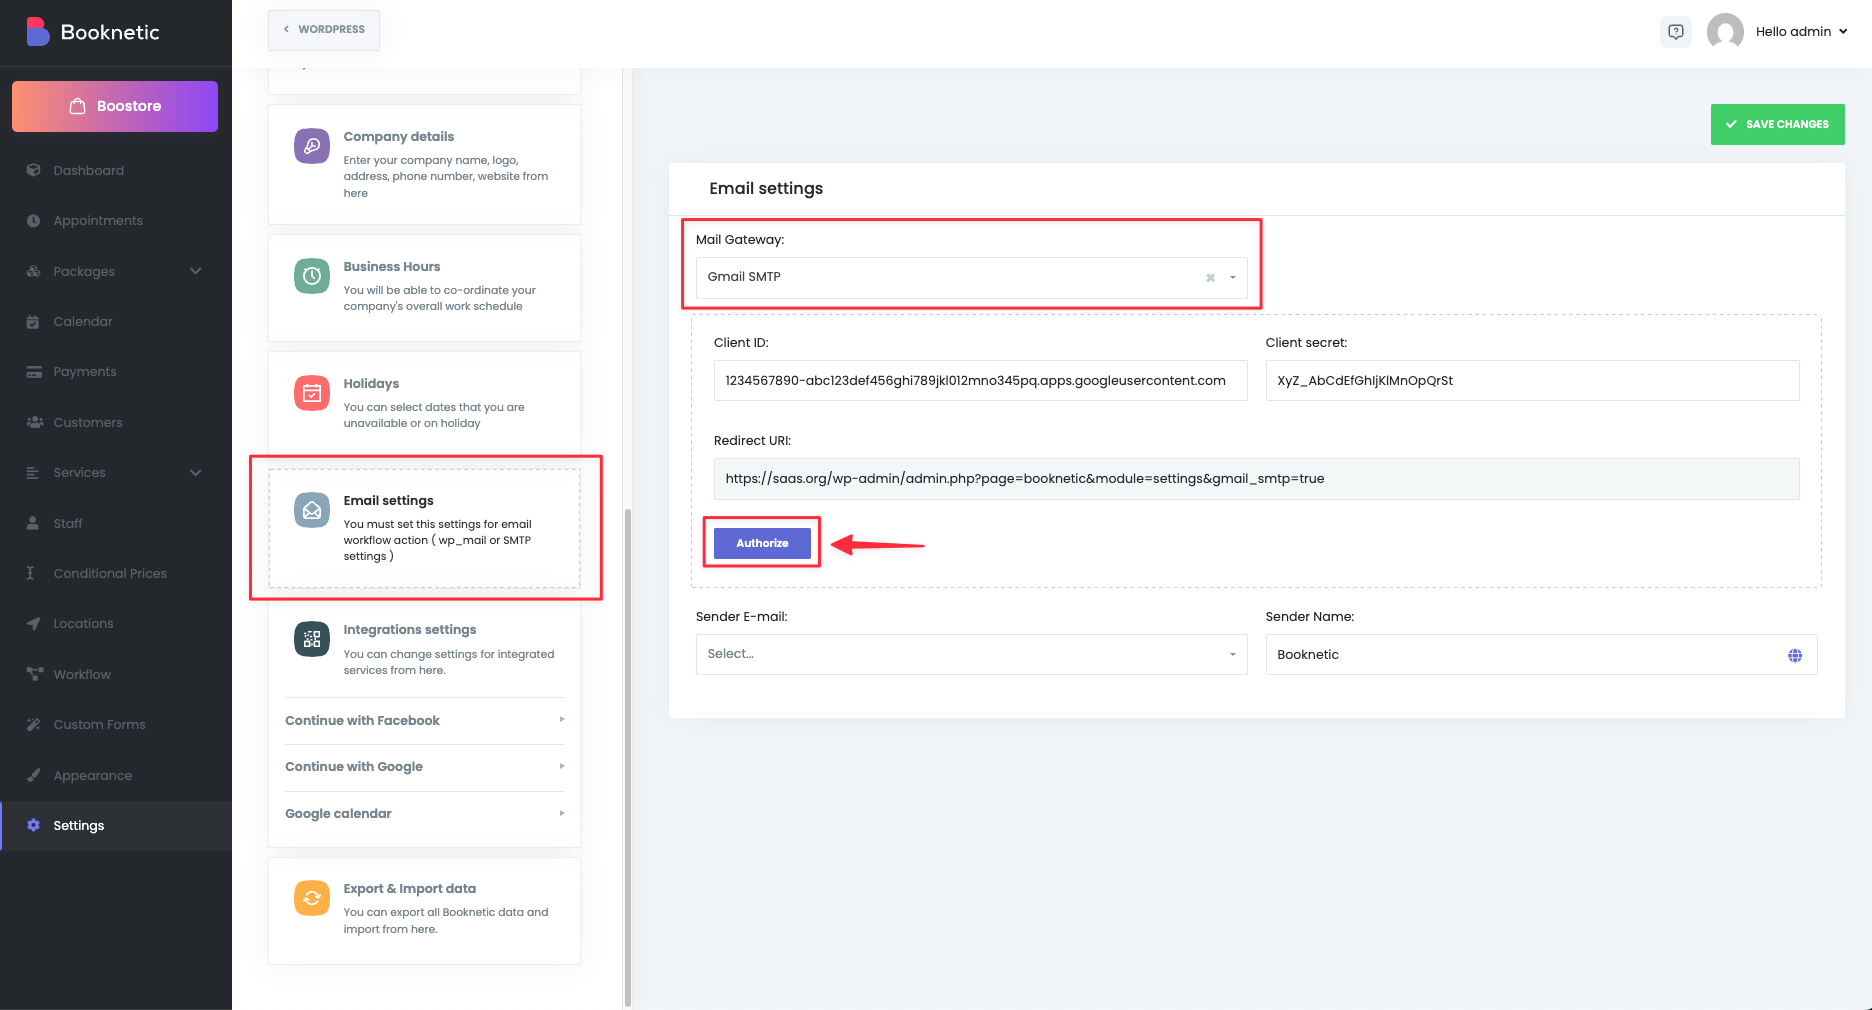
Booknetic supports Gmail SMTP via OAuth 2.0 for secure email delivery.
To set it up:
Go to Google Cloud Console → APIs & Services → Credentials.
Create an OAuth Client ID and Client Secret.
In the Gmail SMTP settings in Booknetic, you’ll see a Redirect URI field. Copy the provided Redirect URI and paste it into the Authorized redirect URIs section in your Google Cloud Console project.
After creating the credentials, enter the following into Booknetic:
Client ID
Client Secret
Save changes.
Once configured, Booknetic will securely connect to your Gmail account and send email notifications without needing your Gmail password.
See Email settings documentation for step-by-step instructions.
In addition to WordPress Mail and SMTP, Booknetic also supports Mailchimp Transactional Emails (Mandrill). This is especially useful for businesses that want high deliverability and professional-grade email sending.
Requires the Mailchimp add-on for Booknetic.
Requires domain verification (via DNS TXT/DKIM/SPF records).
Works best with a Mailchimp Transactional paid plan (the trial plan only allows sending to addresses within the same domain).
After setup, Booknetic will route email notifications through Mailchimp’s transactional email system, ensuring better reliability and higher inbox placement.
For detailed setup steps, see the Mailchimp Integration Documentation.
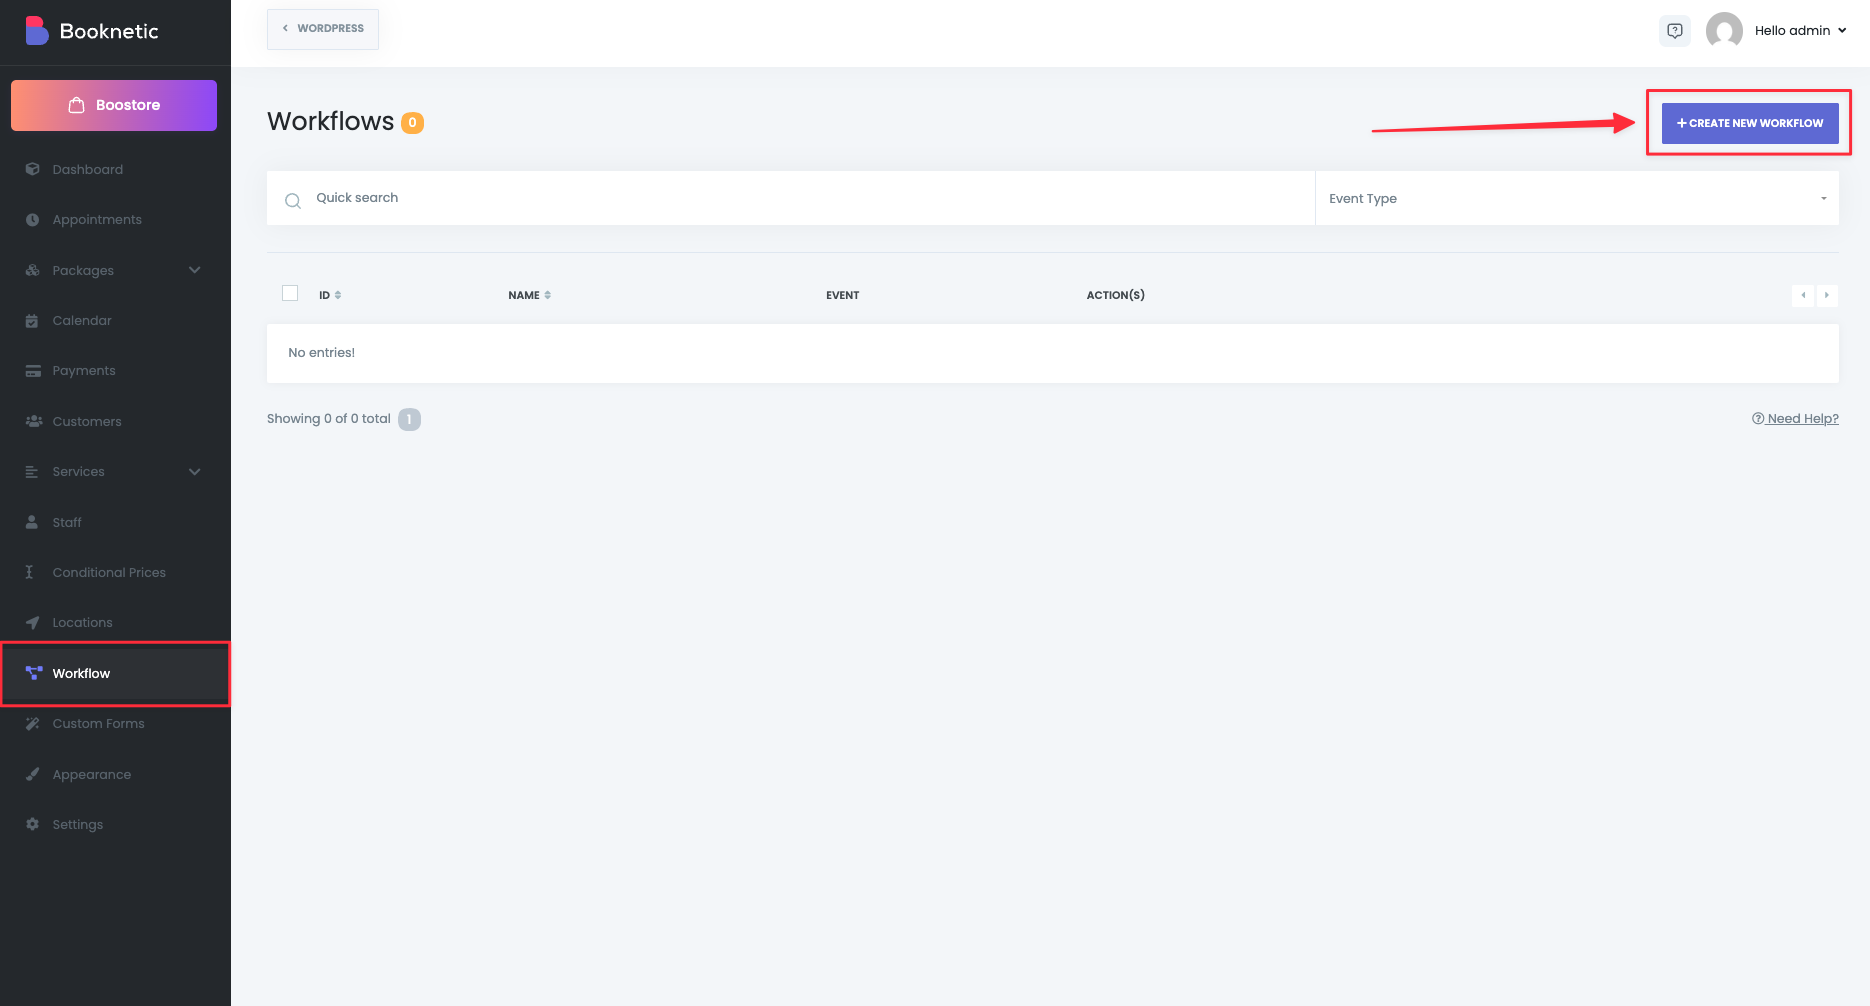
Email notifications are managed inside the Workflows Module. Workflows allow you to automate messages by defining triggers (events) and actions (notifications).
Step 1: Open Workflows
Go to Booknetic → Workflows from the left-side menu.
Step 2: Create a Workflow
Click Create new workflow. Name it so you can identify it easily.
Step 3: Choose an Event
Select when the workflow should activate. Triggers include:
New booking
Booking status changed (canceled/approved/etc.)
Booking rescheduled
Appointment starts / ends
Appointment paid
New customer created
Customer signed up
Customer forgot password
Customer birthday

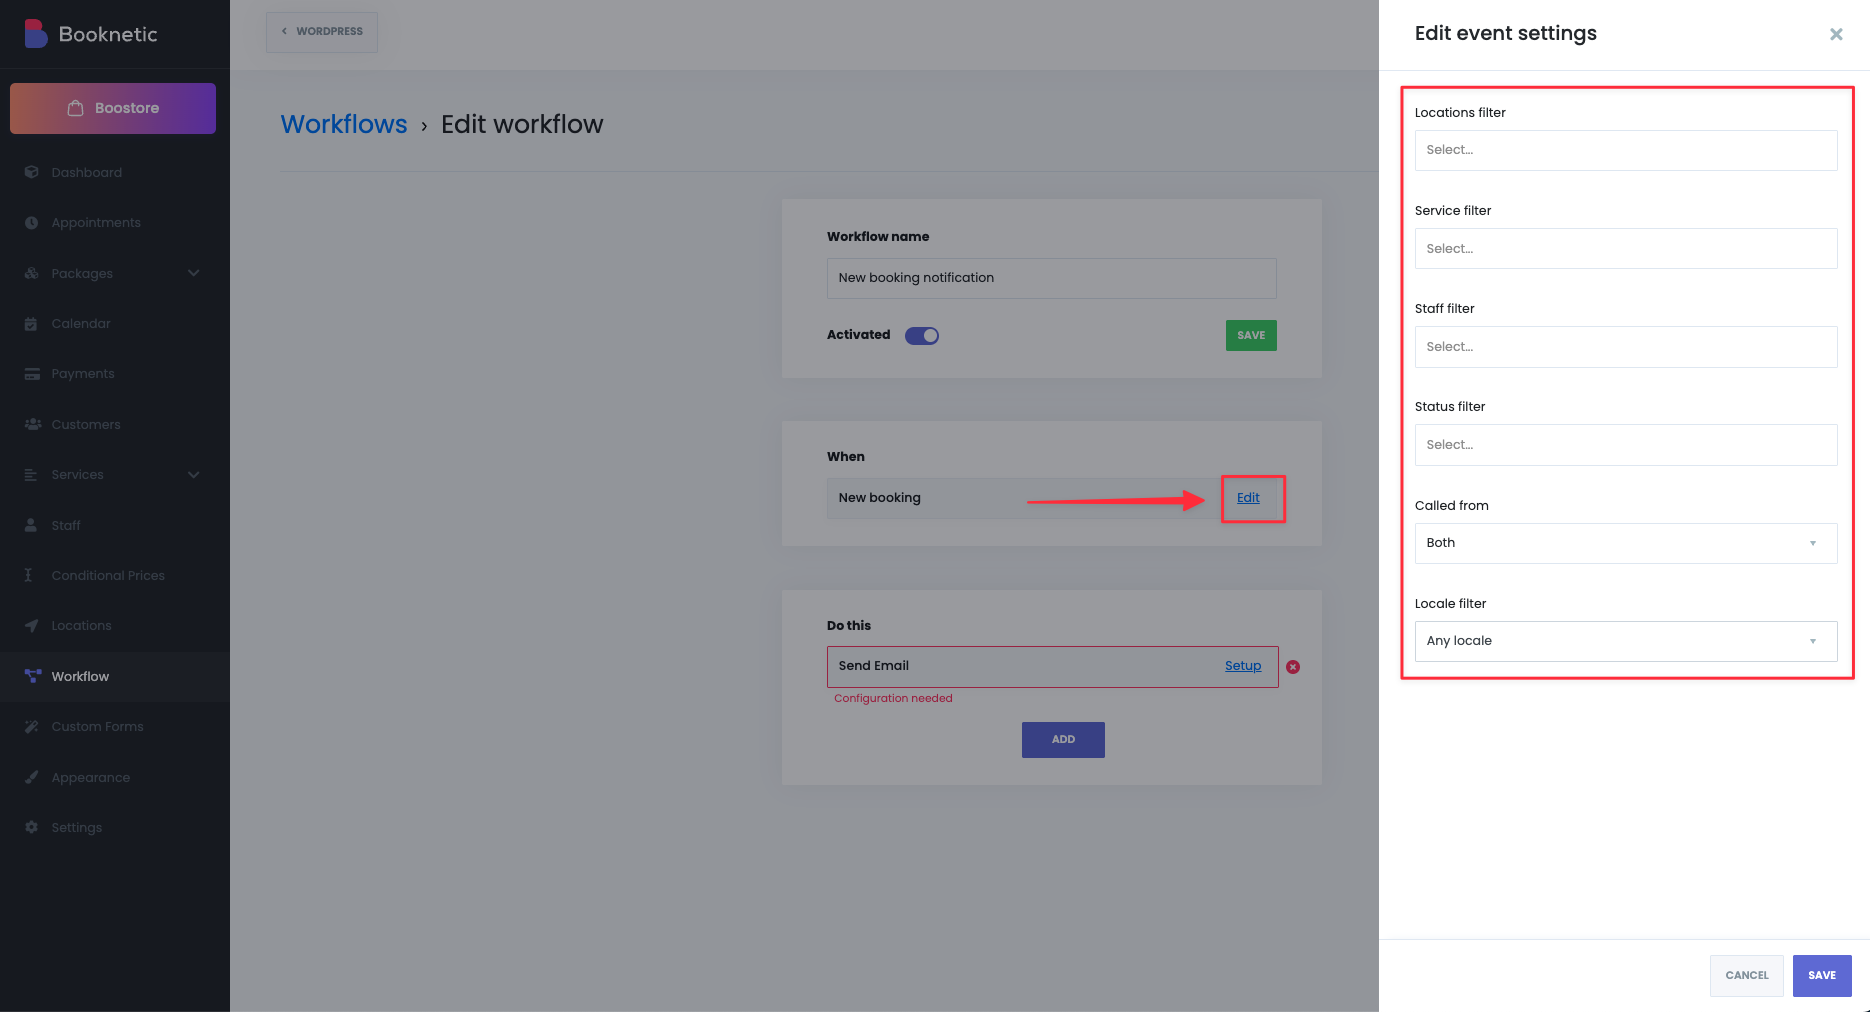
Each trigger can be fine-tuned with filters:
Service, staff, or location filters.
Frontend / Backend booking source.
Language (Locale) for multilingual sites.
Before/after timing (for reminders) (e.g., 1 hour before appointment).
Step 4: Define the Action
Choose how the notification will be sent. Booknetic supports multiple email actions inside workflows:
Send Email – Uses your configured mail settings (WordPress Mail, SMTP, or Gmail SMTP).
Send via Mailchimp – Sends the email notification through your configured Mailchimp Transactional integration.
You can:
Send notifications to customers, staff, admins, or custom addresses.
Add multiple recipients per notification.
Combine multiple actions in one workflow (e.g., Send Email + Send SMS + Send via Mailchimp).
When setting up the email body, you can:
Use rich text formatting (bold, italics, colors, lists, tables).
Insert links, images, or HTML code for advanced layouts.
Add shortcodes (keywords) that dynamically insert booking data.
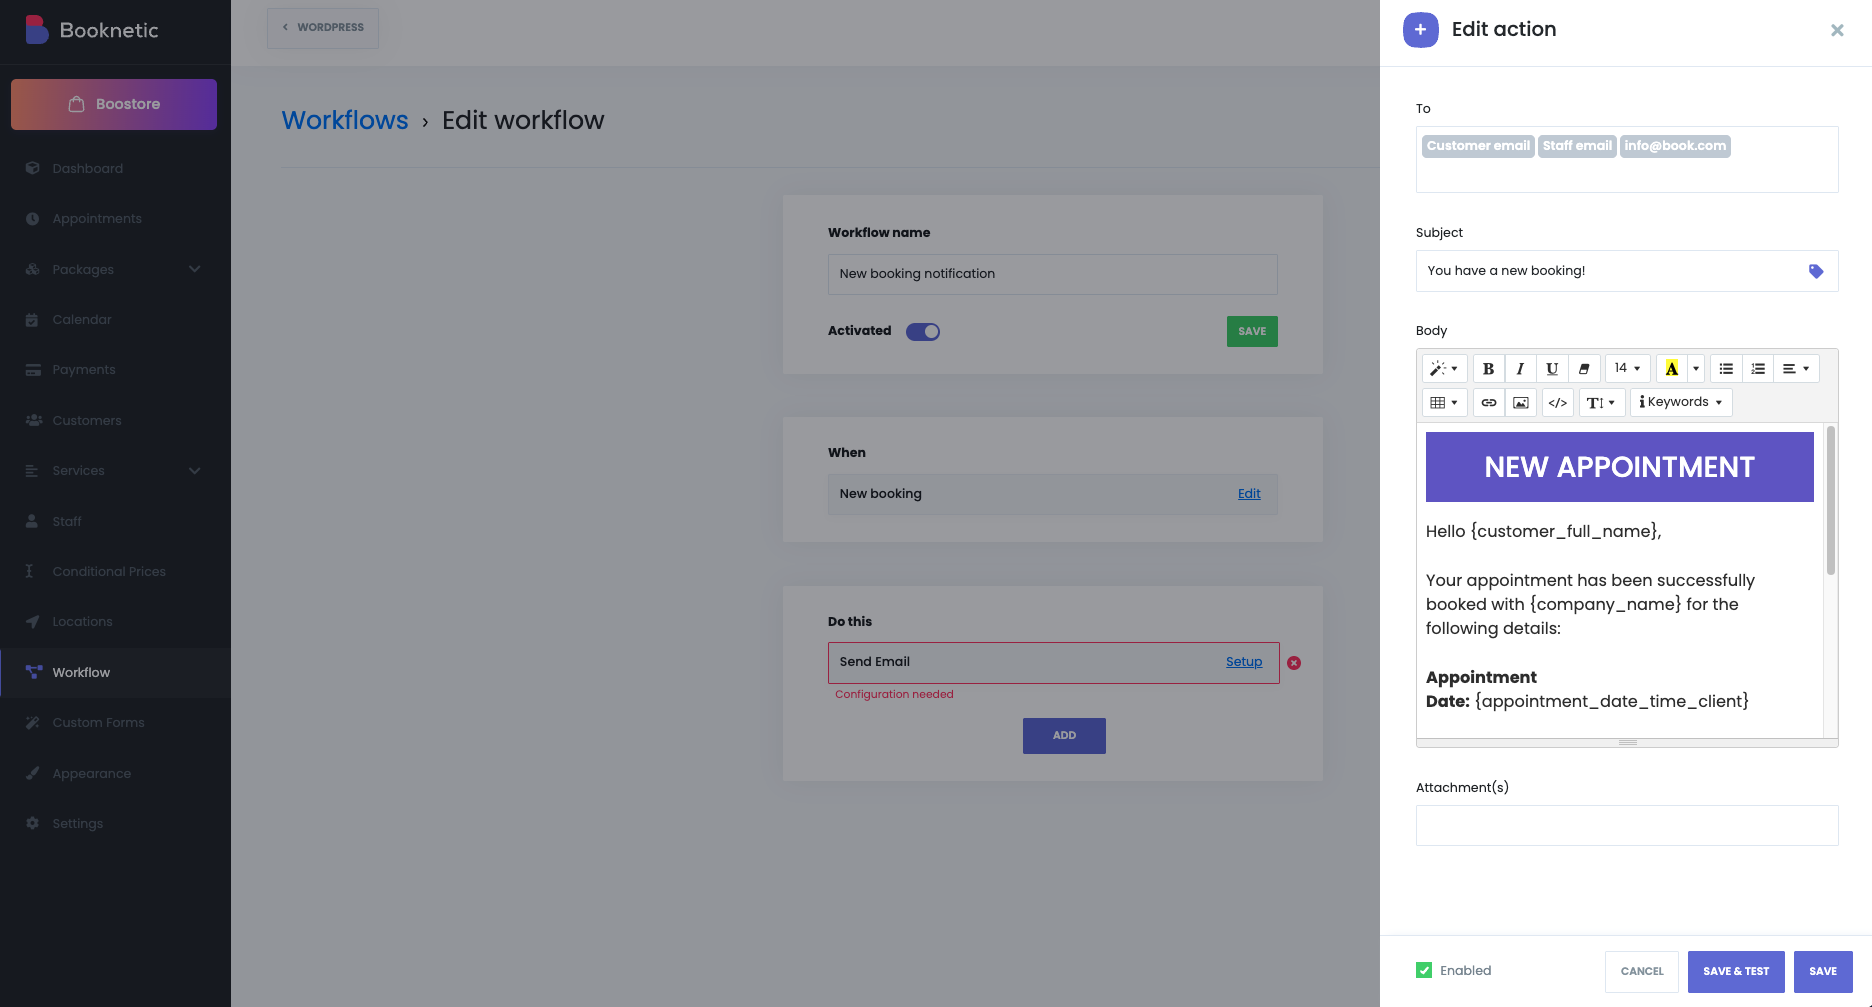
{appointment_date} → Appointment date and time
{customer_full_name} → Customer’s name
{service_name} → Service booked
{staff_name} → Staff member assigned
{zoom_url} → Zoom link (if enabled)
{appointment_extras_list} → Selected extras
NOTE: If a shortcode has no value (e.g., no extras selected), it will be removed from the final email.
You can attach files to your notifications, such as:
Customer-uploaded files (via Custom Forms).
Invoices (requires the Invoices add-on).
Here are the most common automated notifications you can create:
Booking Confirmation – Sent instantly when a customer books.
Reschedule Update – Notifies customers and staff of changes.
Cancellation Notice – Alerts when an appointment is canceled.
Reminders – Sent N minutes/hours before the appointment to reduce no-shows.
Follow-ups – Sent after the appointment to collect reviews or encourage re-booking.
New Customer Registration – Sends login credentials for the Customer Panel.
Customer Birthday – Automatically send personalized greetings or special offers to customers on their birthdays.
Use filters to send notifications only for specific services, staff, or locations.
Use Frontend/Backend filter to control if notifications are sent based on booking source.
Use the Search and Filter function in the Workflows list to find workflows quickly.
Test your notification with Save & Test, but note: shortcodes will not be replaced in test mode (they require real booking data).